Making a Viking Axe - Part 3
Carving the axe handle
Part three of creating the Viking axe is to design a Celtic inspired pattern which will be carved on the axe handle.
The approach will be to draw an extended celtic knot which will cover around 30cm/12″ of the axe handle. As this is my first attempt I decided to use a simple repeating pattern and first drew it out by hand.


Using Affinity Photo, I traced the pattern from a smaller image and extended it to cover 30cm.
As the axe handle is has an gentle ‘S’ curve, I used the warp feature in Affinity Photo to create a gentle undulation in the design. From here I printed the design out on A4 paper.
The pattern needs to be transferred to the handle and the easiest way is to trace the image then reverse trace it onto the handle.
I didn’t have any tracing paper handy but the next best thing is baking parchment which is what I use when applying iron on heat transfer vinyl (that’s another post!). First step is to trace the pattern onto the baking parchment with a thick HB pencil. Don’t bother with anything like a 2H pencil as the next step will fail.

Transferring the pattern to the handle


Take the tracing paper and turn it over and lay it on the axe handle. Using an couple of elastic bands to hold it in place, start to rub down the pattern onto the handle by reverse tracing the image.
Once the feint outline is on the handle, go over the lines with the pencil to make the outline more easily visible.
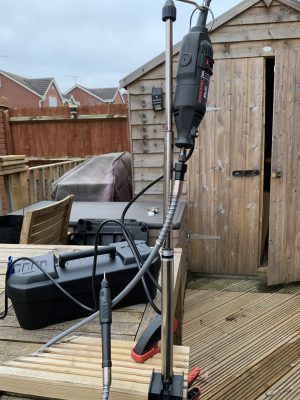
Whilst the Vikings may have preferred more basic wood working tools, here at Fatlab Designs it’s about fusing traditional techniques with modern technology. Time to break out the power tools, in this case a Dremel rotary tool fitted with a flexible extension.
You can use the Dremel tool directly with the burr mounted in the tool but the flexible extension makes it much easier to use the tool for accurate carving.
I used three different burrs, firstly a 1mm diameter ball burr, next a 3mm cylinder burr and finally a 3mm ball burr.


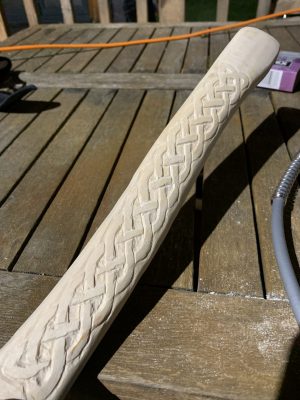
To start the carving, I used the 1mm ball burr to define the outline of the traced pattern. Once the pattern is outlined, I then used the same 1mm ball burr to initially mark and then clear out the central hollows.
For the 3d relief to really pop, I needed to lower the area surrounding the pattern. The best tool here is to use the 3mm cylinder burr held at a shallow angle. This will turn the outer trace from a groove to a smooth step accentuating the raised pattern. I also used the edge of the 3mm cylinder burr to shape the inner parts of the pattern where the weave appears to cross over itself.


Finally the inner parts of the pattern are smoothed with the larger 3mm ball burr. The overall pattern stands proud around 1mm across the length of the handle.
The next step is to sand the handle lightly then use a coarse wire brush along the length of the handle to raise the wood grain.
The outline of the pattern will then be darkened using a pyrography tool with a fine nib to burn the outline of the raised areas.
Ageing and finishing the handle
To follow…


hello is this still active. I was very much enjoying your design process. I am going to Endeavor to do the electrolysis part on my ax head soon. it was just looking forward to the next stage after your carving of the handle to see your finished product.